
Inside Steve Anchell’s The Darkroom Cookbook, 3rd Edition (Focal Press; Elsevier, Inc., Oxford, United Kingdom; 2008), which, by the way, should be a “must buy” for every photographer, on pages 55 – 57 he casually describes the process for developing 35mm film inside its cassette, in broad daylight, and without using an specialized equipment. Setting your skepticism aside, this is a real and viable technique that must be couched in three strong warnings:
1. Do not attempt this process with an exposed roll of beloved film.
2. You will lose a couple of inches worth of exposed film from BOTH the beginning and end of the roll.
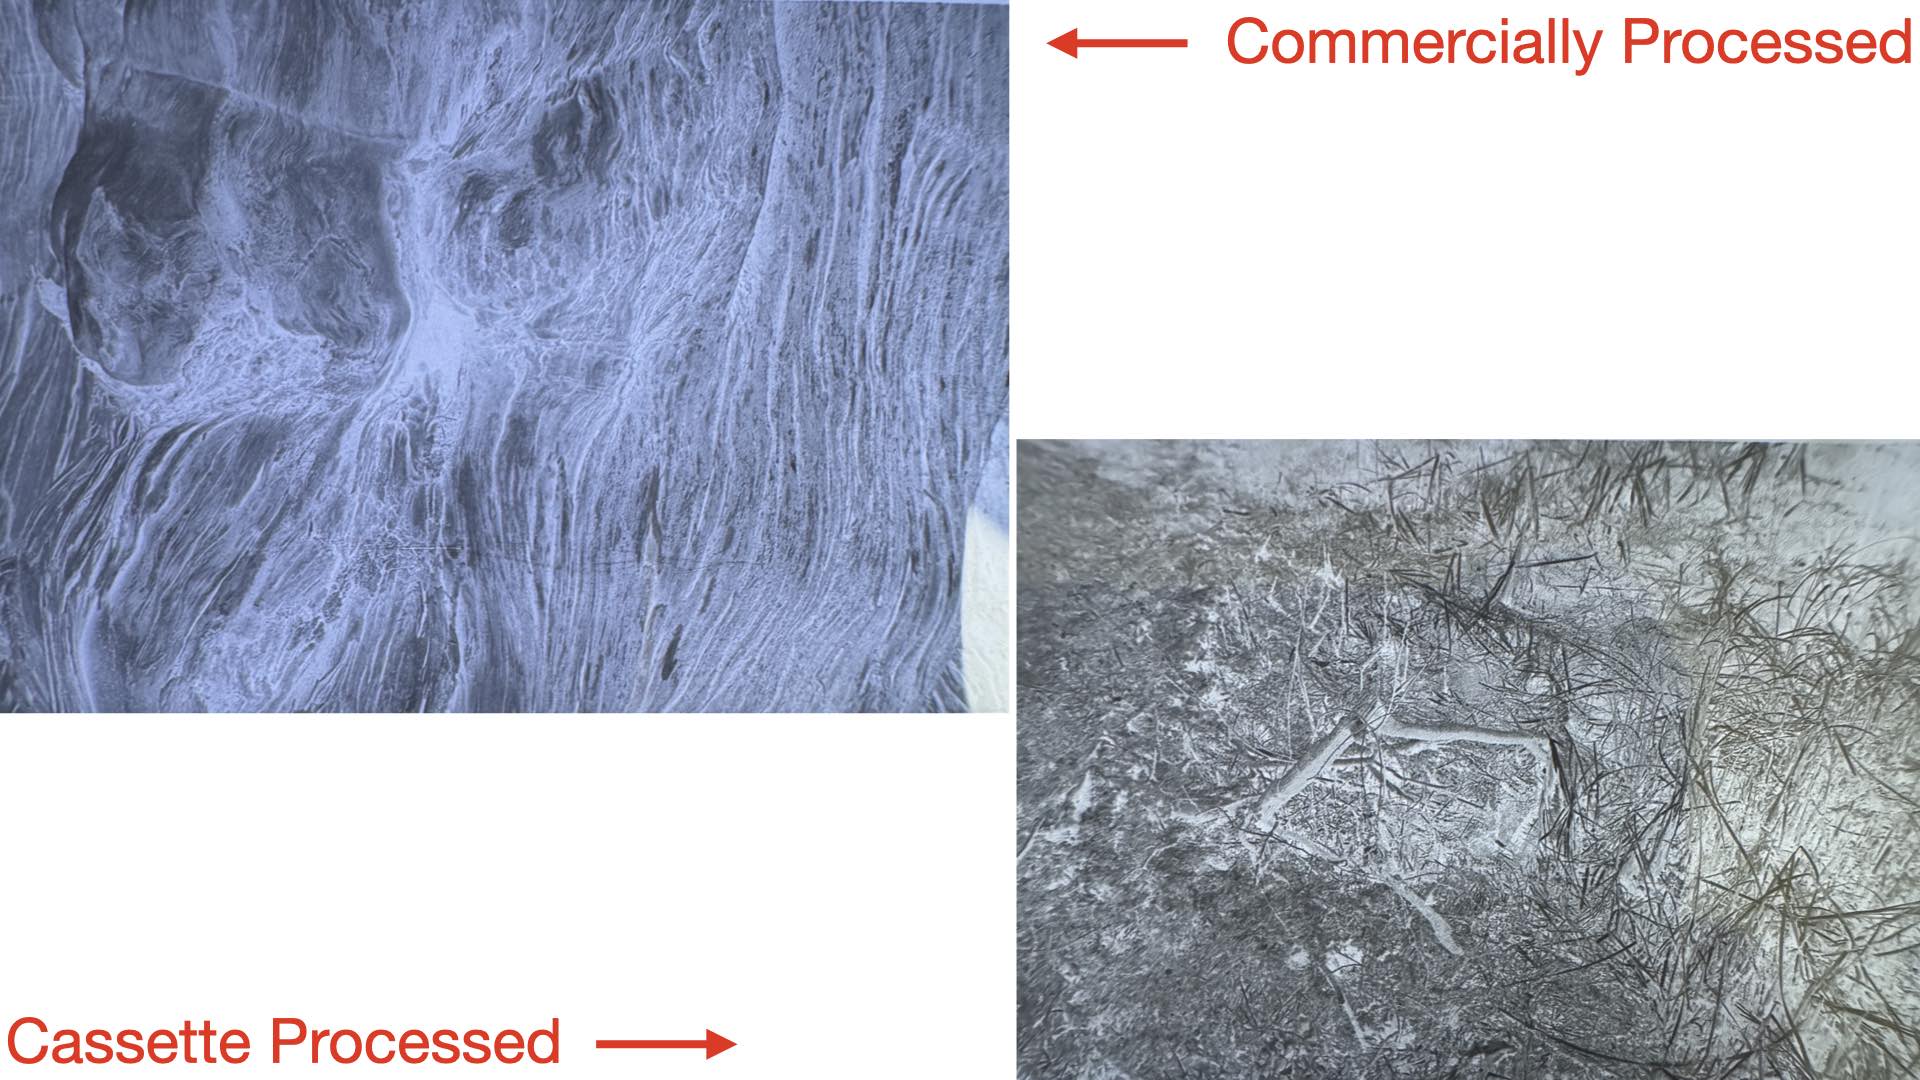
3. The negatives will be much denser than commercially processed film.
In spite of these precautionary notes, however, equipment-less cassette processing does work and the resulting negatives can be printed with beautiful results. But how does it work, you ask? Simply stated, the film is spun inside the cassette while it is submerged in a jar of monobath developer/fixer formula. After approximately, six minutes of film twisting, the cassette is thoroughly washed and your negatives are ready for final critique and scanning/printing.
What You’ll Need
Before you dive into cassette film development, there are a couple of things that you will need to acquire:

1. First, and foremost, you will need an exposed roll of 35mm film. Be forewarned, only 24-exposure rolls will reliably work with this process. Why? There is not enough space inside the cassette for properly twisting the film back-and-forth during development with a 36-exposure roll.
2. A monobath developer/fixer solution will perform the processing. CineStill Df96 Developer & Fix B&W Monobath was successfully used in this article.
3. A pair of Nitrile gloves for protecting your hands during development, as well as lending a grip for twisting the film cassette spool.
4. Two large, wide-mouthed jars; one for holding the monobath and another jar for holding water used for pre-soaking the film. These jars can be easily obtained by recycling an appropriately-sized food container purchased from your local supermarket.
5. An elastic band for holding the exposed end of the film against the outside of the cassette.
6. A pair of scissors for snipping off the retrieved film leader prior to wrapping the film around the outside of the cassette.
7. Optional: A film leader retriever for extracting the leader from inside the cassette.

8. Optional: A pair of laundry hook clips for hanging the film inside a shower for drying.
Twist to the Left then Twist to the Right
When you’ve assembled all of the things you’ll need for developing film inside its cassette, it’s time to prep the roll of film for processing. First, snip off the film leader, then wrap the cut end of film backwards, emulsion side facing outwards, around the outside of the cassette, and, finally, hold this loose film end tightly against the cassette with the elastic band.
Follow the instructions for time/temperature development with your chosen monobath and fill one jar with this solution. Fill your water jar and use the same temperature as the monobath. Slip on your fashionable Nitrile gloves and practice twisting the film inside the cassette, as far as possible, in a clockwise turn direction followed by a counter-clockwise turn until it stops, again. Keep this action going and dunk your cassette down inside the water jar. Perform two complete twisting sequences, clockwise followed by counter-clockwise, while the cassette is in the water jar.
Remove the cassette, set your timer for the correct time/temperature development, and dunk the cassette down inside the monobath jar. Begin the twisting sequence and keep your pace nice and steady Eddie. When the time is expired, transfer the cassette back into the water jar and keep on twisting/untwisting for 2 minutes.
You can remove your gloves, remove the elastic band, and extract the entire length of film from the cassette. Use the scissors to snip off the end of the film from the cassette and continue washing the film inside the water jar. A good method for properly washing the film is to fill the jar, reattach the jar’s lid, and gently invert the jar back-and-forth for 5 minutes. Now drain the water, add fresh water, and repeat the inversion process. Perform this operation four times and your film is ready to dry.

A shower (not occupied, of course) is an ideal “closet” for drying your film. Attach a laundry hook to one end of the film and hang it over the shower head. In order to prevent annoying film curling, attach a second laundry hook to the free end of the film. Wait until the film is thoroughly dry and it will now be ready for scanning/printing and storage.
The Result

Obviously, this technique should not be used for all of your film development. It is a great “get you by,” however, when you absolutely must develop a roll of film in an emergency situation and you are far away from your preferred darkroom location. Then just slap the negatives against a window, take a macro photograph with your smartphone’s camera, “print” your negative with Lomography Lomo DigitaLIZA Lab, and download your final photograph. Oh, and by the way, this workflow would be a terrific summertime project for introducing young photographers to the basics of film processing.
Enjoy.
