

Ok, I’ll admit, I was skeptical. Why would I even want an AI to handle my post-shoot wedding photography? Imagen approached me to test their AI solution, and I agreed. After three months of using their software, I’ll admit it saves a lot of time. And while it’s not perfect, it does help with some of the more tedious tasks of culling and editing my wedding backlog. (As a side, they are now offering 1,000 credits for testing, so it’s a good time to test them out).
Now, Imagen is not just for wedding photographers; it supports portraits, events, school, and sports portraits, as well as real estate photography. That said, I am a wedding photographer, so this is my take from a wedding photography perspective.
What is an AI for wedding photographers?
When I get back from a wedding, it’s not rare that I have over 5,000 images between my second shooter and me. And each wedding needs to be culled and edited. If you are also a wedding photographer, you know that the post-event queue is where the photos spend most of their time.
The goal of an AI for wedding photography (just like any AI, I guess), is to make this process faster and more efficient, and there are a few ways that it helps me:
- Help to cut down from 5,000 to 1,000 photos
- Apply my editing style to each photo
- Fix cropping, lighting, and white balance issues
Those are all “trivial” tasks, but they do take time (and mental cycles), so cutting down on this time should allow me to respond faster to my clients. But does this specific AI by Imagen rise to the task? Let’s dive in!
What is Imagen
Imagen is an all-in-one AI solution for the entire post-production workflow from culling -> to editing -> to cloud storage -> direct delivery to a gallery. (Obviously, wedding photography, which is how I use it, is a perfect match.) It handles the initial culling, the editing, the styling of the photos, and even cloud storage and gallery delivery.
The premise of Imagen is that they work (mostly) inside Lightroom Classic. (They also work with other Adobe editing apps like Photoshop, Bridge, etc. But I use Lightroom, so this is where I’ll focus on this review. The idea is that you create a catalog, upload it to Imagen’s software, and they return the catalog neatly culled and with edited images. This “new” catalog is a great stepping stone for finalizing your edit.
How Imagen works – Training
First, you need to register; Registration is relatively straightforward. You go to imagen-ai.com and put in your email. I got an email with a download link to their software (I am using Windows, but it also works on Apple computers).
Once you install the software, you need to create your editing AI Profile. This profile is how Imagen learns your specific editing style. It is this style that Imagen applies to any images you upload.
The welcome screen shows a few AI Profiles (“styles”), and you can either create a Personal AI Profile based on your past edits and signature style or use one of the existing Talent AI Profiles created by top photographers. If you are curious, you can find those profiles here.

I went ahead and created an AI Profile under my name. Now, this profile needs to be trained with my photos. There are three options to create an AI Profile:
- You can create a “lite” Profile with a preset and a few questions.
- You can use a “talent” AI Profile from leading industry photographers, find a style you want, and adapt/tweak it.
- I have a very distinct style, though, so I opted to create a digital copy of it with the “personal AI profile.”
This requires uploading a few weddings (Imagen recommends a minimum of 3,000 photos, but I uploaded 3,500 and then fine-tuned with 3,500 more).
Imagen recommends uploading photos from various scenarios, locations, and lighting conditions. I assume this helps the AI engine understand your style in different scenarios. The dance floor lighting and style are typically different from the reception and formals, so it makes sense. Note that the final editing style should be consistent so that the AI learns what the desired end result is for the most accurate and consistent AI Profile.
You can select if you shoot RAW or jpg; I shoot RAW, so that was my choice. Imagen also recommends creating separate AI Profiles for B&W and color. I am going to show how this works for color, though I created a BW profile as well.
You need to select the type of photography you are doing, and I am not sure if this impacts how the AI creates an AI Profile, but I chose weddings nonetheless.


Then, you can upload a few catalogs.
You need at least 3,000 photos to get an AI Profile, but if you want a good, more fine-tuned profile, Imagen recommends uploading anywhere between 6,000 and 10,000 photos. They call this process “fine-tuning”. Initially, I started with about 7,000 images and later added another 3,000. The nice thing is that every time you finish a wedding, you only need to upload the catalog file for the fine-tuning process, which is really fast. Because Imagen already has the photos, they just need to know if you agree with their choices or tweak them. Every time you upload a finished wedding, you contribute to the fine-tuning process.
I did see a slight improvement with each fine-tuning, but, at least for me, I got good edits even with the initial upload, and the extra image did not make much difference.


Make sure you upload catalogs that you like and represent your style for the initial upload. Imagen will not upload the entire catalog—there is an easy way to filter it, so you only upload the photos you edited and liked. (You can use stars, flags, and colors for that, so the process supports quite a bit of workflows.)
The upload process pushes both the catalog file and the actual photos, so it may take a while. With my internet speed, it’s about 30-40 minutes per catalog of 1,700-2,000 photos. Depending on your internet speed, milage may vary.
Once the training is done, you’ll receive an email, and you can start working. Expect a few hours between uploading the photos and getting the “we’re ready for you” email.
As I mentioned, you can further fine-tune your AI Profile, but more about that later.
How Imagen works – Culling
When you start a new project, you select if this is a culling project or an editing project, and I recommend starting with culling. (As a quick FYI, “Culling” means “reduction of a wild animal population”, so you are effectively terminating the photos you don’t need). Since editing is charged per photo, and at the end of a wedding photography session, you have many photos to reduce, it makes sense to cull first. This is quite similar to my previous workflow as well.
You start by selecting a catalog and uploading it to Imagen’s software. Since you are uploading the complete set of photos and since it’s the RAW files, uploading can take a bit. For me, something like 4,500 photos would take about one and a half to two hours.

When you upload for culling, you can set a few options. First, you can adjust the culling process to match your workflow and decide how to mark keepers, duplicates, and stand-alone. Depending on your workflow, you can decide between stars, colors, and flags. You can even mark the low-quality photos.
Dup reduction is one of the most annoying tasks when culling, and you can select how similar photos need to be considered dups.

Lastly, you can export as a Lightroom catalog or as XMP sidecarts. I am using the catalog as it ties in with my workflow.
Once the culling process is completed, you’ll be notified and can review the AI-culled selections.
When you start the review process, you’ll be greeted with a summary that shows you the status of the catalog. Specifically, how Imagen marks Keepers, Dups, and Standalones, and also how many of each you get. One thing that I would love to see is a clearer good vs. bad image count. (right now, you need to calculate the standalone + the keepers manually)
If you are working with Lightroom, the culling review interface will be very familiar to you. You get the familiar filters, such as flags, colors, and stars.

For each image, you can see the star rating (which tells you if this is a standalone or a duplicate stack); for the dups, it tells you how many dups you get. For 90% of the images, Imagen gets the selection right. This means it picks the best photo of the dup stack.
One of the perks here is that you can cull with edited previews, which essentially means that you can apply your preferred AI Profile to the photo previews and cull while viewing the photos in their most optimal state.


If you are unsatisfied (the remaining 10%), you can drill in and override the selection.
Image corrections, AI profiles, and style
Once you agree with the culled photos, hit “Edit”; this will send the top selections (keepers and standalone) for editing. Only the edited photos will be billed, so any photo that got scrapped in the culling process is not counted toward your final billing.
You can select a few actions to apply. Obviously, you want to apply your profile (or any other profile from the AI Profiles library). You can choose to apply a crop, straightening, skin smoothing, teeth whitening, and masking the background.

Once you are satisfied with your selection, hit edit. (If you opt for AI features like straightening and cropping, there is an additional fee of 1-2 cents per image).


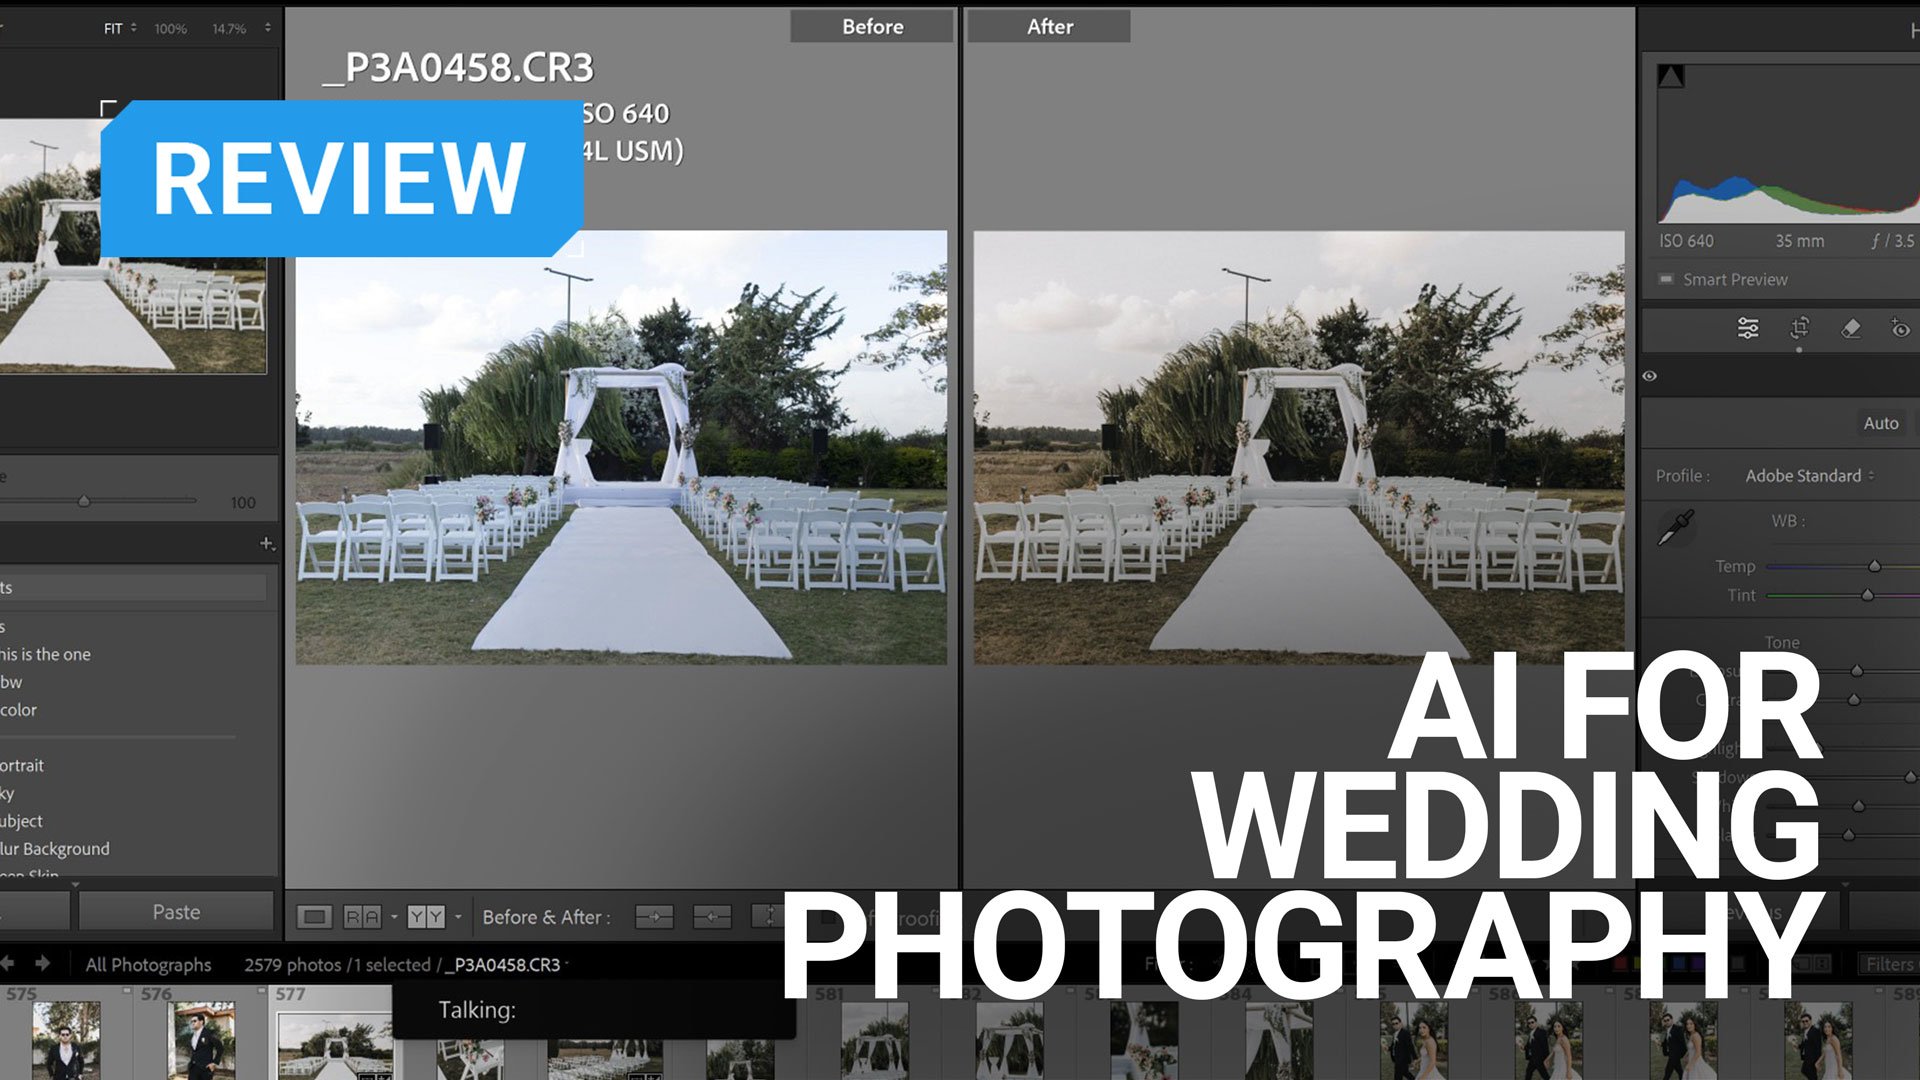
About an hour and a half later, you’ll see a download edits button that applies the AI profile to your catalog.
The new catalog has two adjustments applied. It fixes any exposure and white balance issues, but more importantly, it “magically” knows how to apply my look to the image. Here are a few before/after.
I was kinda surprised that the AI filter worked well on all kinds of photos and knew my look for photos of different stages of the wedding. So, it has my style for formals, dance floors, decorations, and so on, despite the fact that I apply different settings to each type of photo.
I shoot Canon, and some of my second shooters shoot Nikon. It was a pleasant surprise to see that no matter which camera a photo came from, it got the same look and feel.

Now, once you have the catalog ready, you can decide how to use it.
Delivering with PicTime
For me, I deliver to my clients using PicTime, so it is very convenient that I can “push to PicTime” and get a wonderful gallery that I can send to the newlywed.
I like using PicTime because it makes it easy to communicate with clients, and they get a really nice gallery right from the start, even before they mark their favorites. If they want any extra work on any of the images, there is an easy way for them to tell me, but more importantly, they handle the entire printing process.
The clients can order albums, wall pieces, and so on, with whatever markup I want to collect, and its self-serving approach is saving me a lot of time. Of course, if they want anything premium, I can still make it happen, but for all the more trivial orders, I do not need to get involved.
Pushing to PicTime is as easy as hitting upload, and then you can go to PicTime and tweak the gallery setting.

Cloud Storage
Even if you are not using PicTime, Imagen offers Cloud Storage. Again, there is a benefit here for working your backup right into the workflow and having it readily accessible from the app, where you do most of your work anyway. Pricing-wise, at the time of writing this review, Imagen charges $10 for each 2 TB. This is about half as much as Google’s Cloud storage at $20 per 2 TB. Plus, when subscribing, you get 3 months of free storage.
Value for money
This is always a charged topic, and in the end, each one should make their own decision. For me, though, this is a definite yes.
The Imagen pricing structure is built on the number of images you edited using the software, and there is a full breakdown here. Imagen charges between $12 a month in an annual plan for Culling (or $18 if you book monthly), so for me, an average wedding would be around 1,000 images at about 4.2-5.2 cents an image (depending on if I use any of the extra AI Tools – those differ according to the photography genre with dedicated tools for real-estate photography such as Perspective Correction, HDR Merge and Windows Pull as well as Portrait Crop or Headshot Crop for portrait photography). This is about $45-$55 per wedding. Here is my view on those $50.

I estimate that between culling and editing, Imagen saves me about 4-5 hours of work for each wedding. In turn, this roughly doubles the number of weddings I can crunch in an editing shift.
From a cold perspective, I value my time significantly higher than $12/hour, so it’s worth it. However, this enables me to deliver weddings faster, which means a lot to the newlywed.
I am toying around with the idea of adding a fast turnaround option to my catalog, where I deliver in a shorter time and charge for this service. This would not only cover Imagen’s fees but also allow me to offer some extra service to my clients. I am still undecided on this, but I will update you once I make a decision.
