
Creating an astrophotograph requires planning, photographing the night sky and careful processing. Combining all of these leads to an image that you may have envisioned even before you started doing any of these. One requires some patience and technical and artistic skill to achieve the desired results. In this article, I discuss stories and techniques behind creating some of my favourite images from 2024.
Human and space
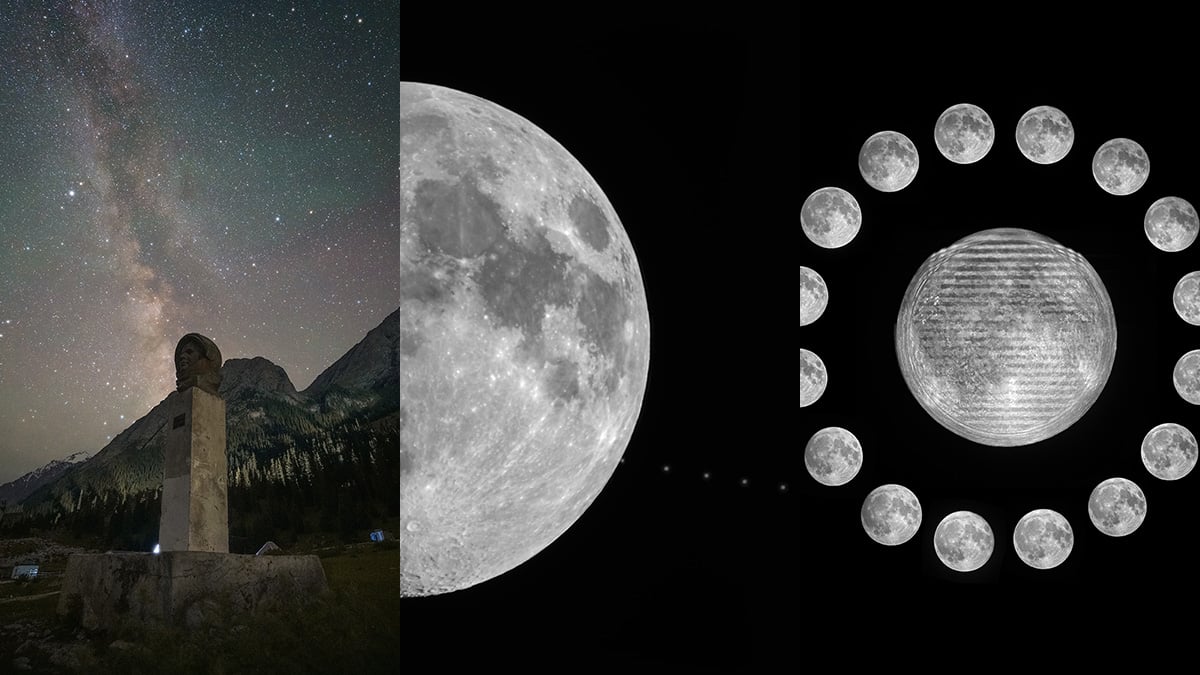
This image was planned at least 4-5 months before the trip, but I almost missed the opportunity. During my Kyrgyzstan trip, the third location was Barskoon valley. This area is surrounded by mountains and a mountain river flowing down the gorge. While looking at the images from this location, I initially came across a statue of Yuri Gagarin, the first human to space. Looking at Google Maps and Google Earth, I realized that the statue was facing East. My plan was to photograph it from the North-East direction, which would allow me to capture the Sagittarius arm of the Milky Way as the background in the South-west direction.
In June 2024, on the 5th day of the trip, I reached the location. Before doing a night session from any location, I prefer to do a recce of the region to find suitable spots and composition during daylight. However, I reached this location almost at sunset and could not manage to scout the area before it was night. I, along with my teammates, began the night session from a location nearby to our stay, and the session continued till almost 3 am. This was when I realised that I had to capture an image of the Gagarin statue. Accompanied by four of my teammates, we ventured through the valley in order to find the statue. Note that it was pitch black, and things even 4-5 meters away were not visible. We turned our headlamps on, hoping to figure out the statue’s location. We continued our walk for 15-20 minutes but failed to locate it. Disappointed, we started our way back to our tents. When we were just 2-3 minutes away from our tents, I heard someone shouting that he had found the statue. And it was on the ground just next to our initial shooting location.

This instantly changed the mood of the group. But the joy did not last long as we couldn’t figure out an entrance to the statue. The whole area was fenced, and a signboard read “Military Area”. It took us another five minutes to decide whether we should go ahead and cross the fence. Since our intention was only to do some astrophotography, we decided to jump across the fence with all our equipment and reach the spot. I took a couple of single images with the planned composition, and so did others.

Upon returning home and beginning processing, I realised that this would be the most iconic image I have ever captured. Since it was a single image, I “double/dual processed” the image: one for the foreground and one for the sky. These two versions were finally blended in Photoshop using masks.
Equipment details: Nikon Zf, Nikon Z 14-24mm, Leofoto LS 323c + LH 40
Exif details: 20s, f/2.8, ISO 3200, 17mm

Lunar occultation of Saturn
On 15th October 2024, the Moon and Saturn presented us with a unique opportunity to capture a rare celestial event, an occultation. For a short period, Saturn would hide behind the moon and then reappear from the other side. This event was luckily visible from my home location, and I decided to photograph it from my terrace. The disappearance event was supposed to begin around 12:30 am. My plan was to capture a sequence of the movement of Saturn relative to the Moon. I decided to start right at 12 am to capture the sequence before the disappearance and end the session at around 2 am, 30 minutes after the reappearance.
By 11 pm, I had my dinner and was prepared with my equipment. I had the choice to either shoot the event with a Nikon Z6ii or with a cropped sensor Nikon D5600. I figured that with a full-frame camera, shooting at a 600mm focal length, I would have to crop the image more than with a cropped sensor camera. I also figured that for these kinds of images where I was tracking and there was no need for using high ISO, a cropped sensor camera would be a better fit.

Before the occultation began, I captured 200 images of the lunar disk. My session for the occultation began at 12 am, and it went smoothly for the first part. The sky was clear, and the whole event was visible to the naked eye. Right before the reappearance part, the western sky was filled with haze and a little bit of cloud. And that was a nightmare. Since I knew the exact timing for the reappearance, it did not create any issue with continuing the session. However, the low altitude of the moon (15 degrees) and the haze made it impossible to see it with the naked eye.

For the processing part, I initially worked with the 200 images of the moon. I pre-processed them in PIPP, stacked them in Autostakkert, and processed them in Photoshop. For the sequence of the occultation event, I captured a total of 14 images: 7 images before the disappearance and seven images after the reappearance, all captured at an interval of 5 minutes each. I manually aligned these 14 images in Photoshop and applied some minimal processing (curve and brightness adjustment, sharpening, etc.). Once the sequence was prepared, I replaced the lunar disk of the sequence image with the initial lunar disk image, which, of course, had more details due to stacking. I also created a faux-HDR version of the moon with the previous month’s full moon.
Equipment details: Nikon D5600, Sigma 150-600c, iOptron Skyguider Pro, Leofoto LS 364c + LH 40
Exif details: 14 * 1/100s, f/6.3, ISO 1600, 600mm (for the Moon and Saturn sequence); 200 * 1/125s, ISO 200, 600mm (for the lunar disk)

50 full moons: A quadrennial journey
Although this image was finalized and created in 2024, only a part of it was captured last year. The data for this image was captured over 4 years, making it the most extended astrophotography project I have ever done. This image consists of 50 full moons from October 2020 to October 2024. Data collection for this image started right at the beginning of my astrophotography journey, back in late 2020. This was the month when I bought the Sigma 150-600c lens and started photographing the moon.

As I started photographing the full moon every month, I never thought that I would be able to continue this for 4 years. The image was never planned. Only towards the middle of 2023, when I had captured around 35 full moons, did I realise that I could and should continue this project to make it to 50 full moons. The photographs were taken with the same camera (Nikon D5600), the same lens (Sigma 150-600c) and at the same focal length (600 mm) to maintain parity among the lunar disk photos. Every month, on the night of the full moon, I would take 300-400 images of the moon. This, of course, came with its own challenges: the weather. Especially during the monsoon period, I had to wait for hours on the terrace, waiting for that small window when the moon would appear out of the clouds. Luckily, with some patience, I managed to do that every time.

Data-keeping is one of the most important things for these kinds of long projects. I created a folder for all the data with sub-folders for each full moon (with their name). It was also essential to keep a backup for the data, just in case. After every 3-4 months, I would stack the individual full moons and process them in Photoshop and keep the processed image as a TIFF file within the specific sub-folder. After four years, I ended up with 600 GB of data.
The other major challenge was to make the final composition for the collage. What I wanted was to combine science, art and myth into a single image. The hunt for the collage design began in January 2024. By the middle of the year, after trying out more than 10 design ideas, I finalised the Triple Moon symbol, borrowed from the Pagan tradition.

Equipment details: Nikon D5600, Sigma 150-600c, Digitek/Benro/Leofoto tripods
Exif details: Varied shutter speed depending upon weather and seeing conditions (1/200s-1/800s), f/6.3, ISO 250, 600mm

Clear skies!
