
You’ve got to hand it to Lomography, they certainly know how to create engaging, unique, and affordable film cameras. From the dizzying Spinner 360° to the pocketable Lomomatic 110, Lomography cameras are oh so fun. Case in point, the LomoMod No.1 is a radical departure from any other camera on today’s marketplace.
For one thing, it’s made from cardboard. Yes, cardboard. But, it gets better. This cardboard construction is held together without any glue or fasteners. It’s an awesome demonstration of, what Lomography calls, “traditional sashimono carpentry.” Furthermore, and this is where the LomoMod No.1 gets extremely exciting, this cardboard camera is a tour-de-force do-it-yourself kit. Priced at an astonishingly affordable $59, this medium format camera is a must buy for every photographer.
[Related Reading: Lomomod No. 1 review: a fun and frustrating DIY cardboard camera with a liquid-filled lens]
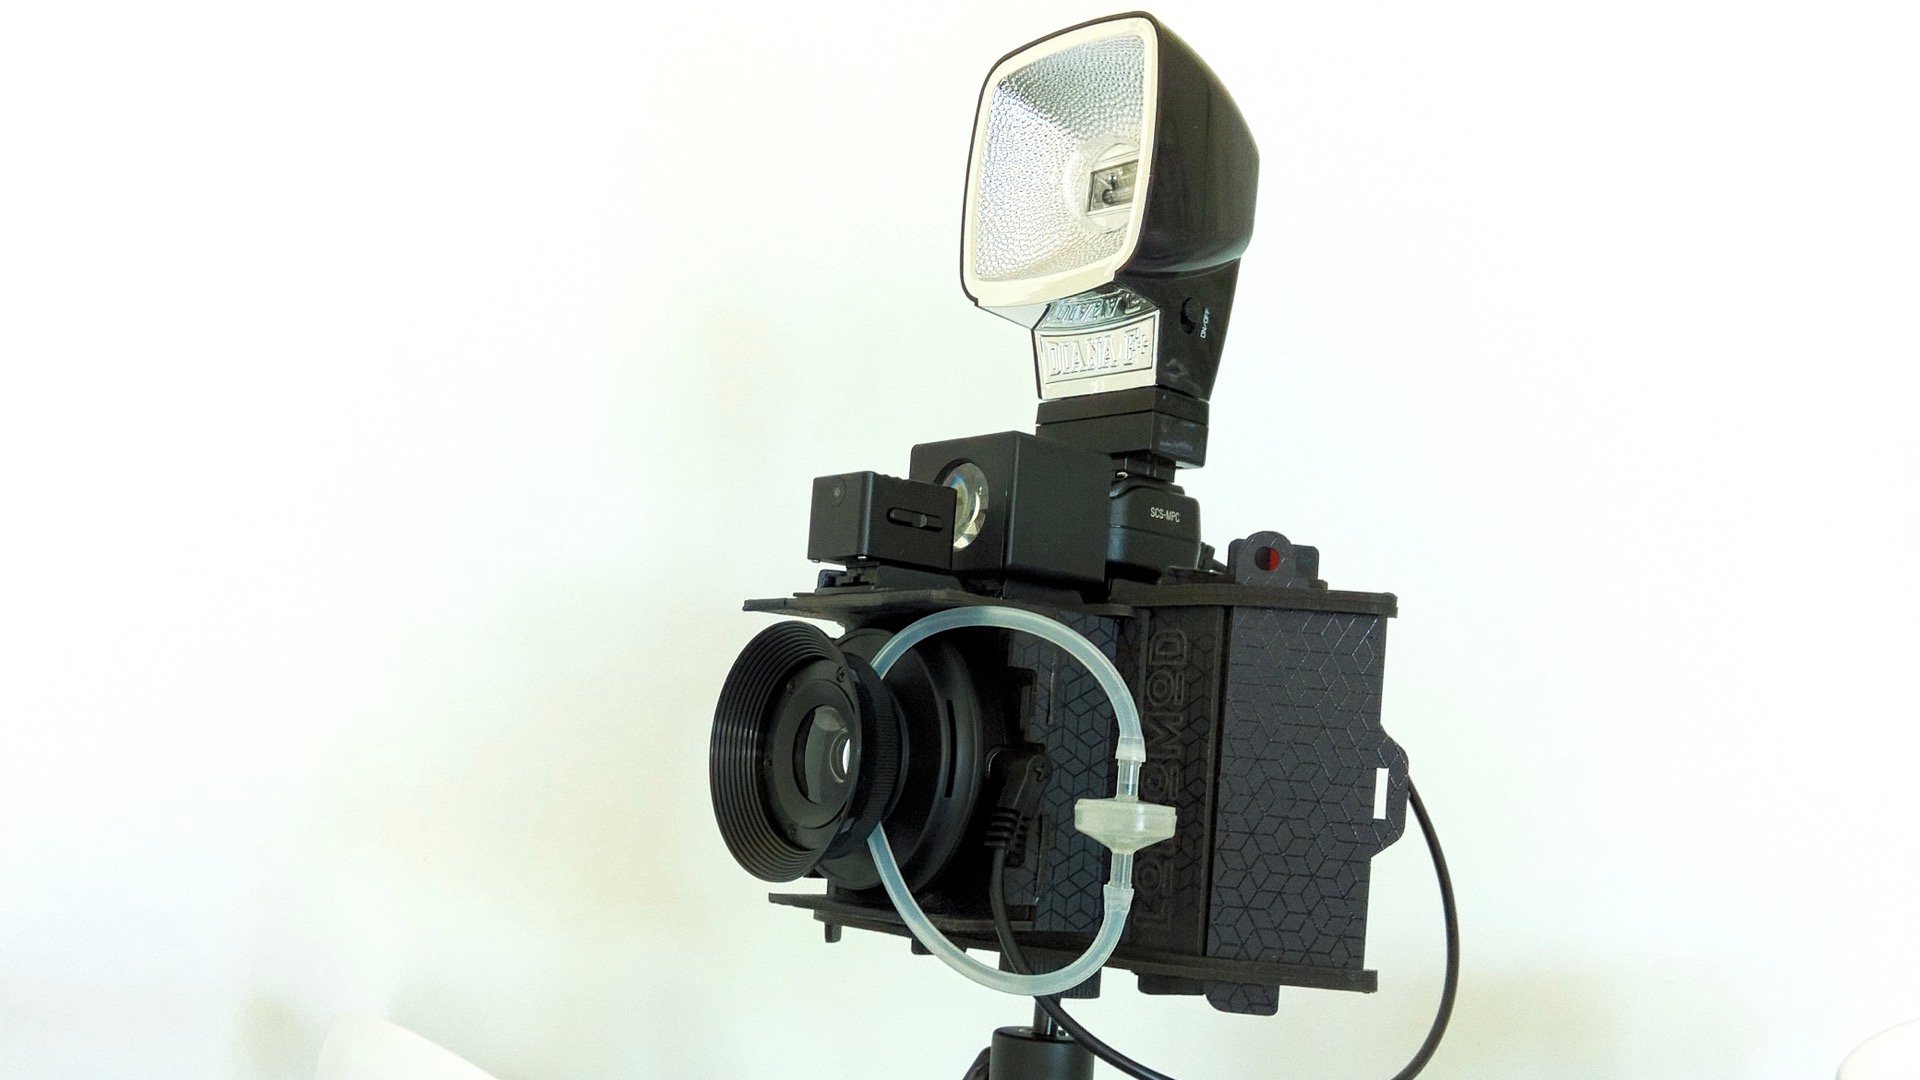
Bundled inside the delightful LomoMod No.1 cardboard kit is the experimental Sutton Water Lens which uses aperture plates for controlling depth-of-field, a shutter mechanism for selecting either 1/100th of a second or bulb speeds, a Prontor/Compur (PC) connector for a flash, a threaded cable release socket, and a metal tripod mount. Best of all, however, there are no tools required for assembly and the LomoMod No.1 doesn’t need or use any batteries–tool-free and no batteries required–it simply doesn’t get any better than that, folks. Bravo, Lomography!
Making Good Enough, Even Gooder
In spite of all of these laudable attributes, there are a couple of things that could be done to the LomoMod No.1 for making it even better. Thankfully these alterations, won’t break the bank, either. This laundry list for LomoMod No.1 improvements includes: a light meter, a proper viewfinder, a conventional electronic flash shoe attachment, the provision for interchangeable lenses, and the ability to use 35mm film. Well, if this wish list ticks all of your boxes for features that you would love to see on this cardboard camera, then you’re in luck. Because, ladies and gentlemen, meet the LomoMod No.1.5!

No, this isn’t an officially-sanctioned upgrade release by Lomography. Rather, the LomoMod No.1.5 is an extension of the DIY aesthete that is embodied in this cardboard camera. The required parts list for this modification are:
While it isn’t absolutely necessary to trim the original LomoMod No.1 lens mount, the front lens cap/flap and side braces can be removed. Once these original parts have been eliminated, you can decide whether you want to trim the upper and lower lens shades. Just remember to leave enough room on the top shelf for holding your accessory shoes.
I Need How Many Shoes?
By virtue of its wedding cake-tiered upper deck design, the LomoMod No.1 is ideally suited for an easy non-destructive modification. Depending upon your desired configuration, up to three adhesive-backed accessory shoes can be mounted on the camera. These three shoes would hold: the KEKS light meter, the Xuanlens viewfinder, and the Impact hot shoe sync. In this setup, all three of the shoes are mounted backwards. In other words, each of the accessories will be slid onto the shoes from front-to-back. It’s awkward, but it ensures that each component can be easily mounted and removed from the camera. This flexibility is essential when one of the accessories, like the electronic flash, isn’t needed during an upcoming photo-shoot.

Your LomoMod No. 1.5 medium format camera is now ready for use. There is one important operational caveat that must be made for successfully exposing roll film, however. While winding the take-up spool, there “should” be a smooth, easy twisting action. Occasionally, the film spool can freeze, stick, and bind, making the take-up spool impossible to turn.
When this stoppage happens, too much torque can actually break the take-up spool knob. In order to eliminate this problem, carefully “unwind” the film spool as you are winding the take-up spool. This reduction in tension will ensure that the film is smoothly wound between each frame.
35mm Photography with a Medium Format Camera
There is one strong virtue hidden in the design of the LomoMod No.1 camera. Your brand new LomoMod No.1.5 (as well as the original LomoMod No. 1) is one of the few medium format cameras that also use 35mm film. That’s right. By using a simple adapter, 35mm film can be exposed inside the LomoMod No.1.5.

Using the HOLGA 35mm to 120mm Film Spool Adapter kit, two small caps are attached to the 35mm film cartridge. The film’s leader is then threaded through the slot of the 120-format take-up spool and the film’s loose end is taped in place. Slowly advance the take-up spool one complete turn of the knob, then attach the camera’s back plate.
Be sure to place a piece of light-blocking tape over the paper-backed film counter opening in the back plate. Perform two full revolutions of the take-up spool and be sure that the film cartridge knob freely rotates during this film advance. You are now ready to expose 35mm film in your LomoMod No.1.5. This technique exposes approximately 1.5 frames of conventional 35mm film frames during each exposure. Likewise, you must turn the take-up spool knob 1 1/2 full turns following each exposure.

It should go without saying, but a camera made from cardboard is bound to suffer from possible light leaks. Therefore, before you expose any film with your LomoMod No.1.5, you should take a bright light and shine it on the exterior surfaces while viewing from within the camera body. When you discover a light leak, cover the area with light-proof tape. One area that is prone to light leaks is on the camera’s back near the two tabs that flank the film counter opening.

And two final “gotchas” about using 35mm film. Yes, you will need to use the same, previously-mentioned film advance technique for reducing film tension during winding. Oh, and don’t forget that you must rewind the film into the 35mm cartridge prior to opening the camera’s back. Once you’ve solved the light leaks, mastered the film advance peccadilloes, and configured your LomoMod No.1.5, you’ll have a remarkably useful medium format camera with a Leica L39/M39 screw thread mount and a focus-free water-filled lens. A true DIY darling that will amaze you with versatility and reward you with outstanding photographs.


Enjoy.
